Showing posts with label how-to. Show all posts

Tuesday, March 1, 2011

Heel issues: bring in the reinforcements

Can we talk for a minute about socks? I love them, first of all. I'm one of those people with perpetually cold feet and hands, so I'm a huge fan of wool appendage coverings. I developed a minor obsession with Smartwool socks a couple of years ago; after making fun of those idiots who would pay $18 for socks, I figured out it there was a method to their madness. I've recently run into a slight flaw beloved woolies--they eventually wear out. Check out this heel:

Sigh. Unwanted heel ventilation.

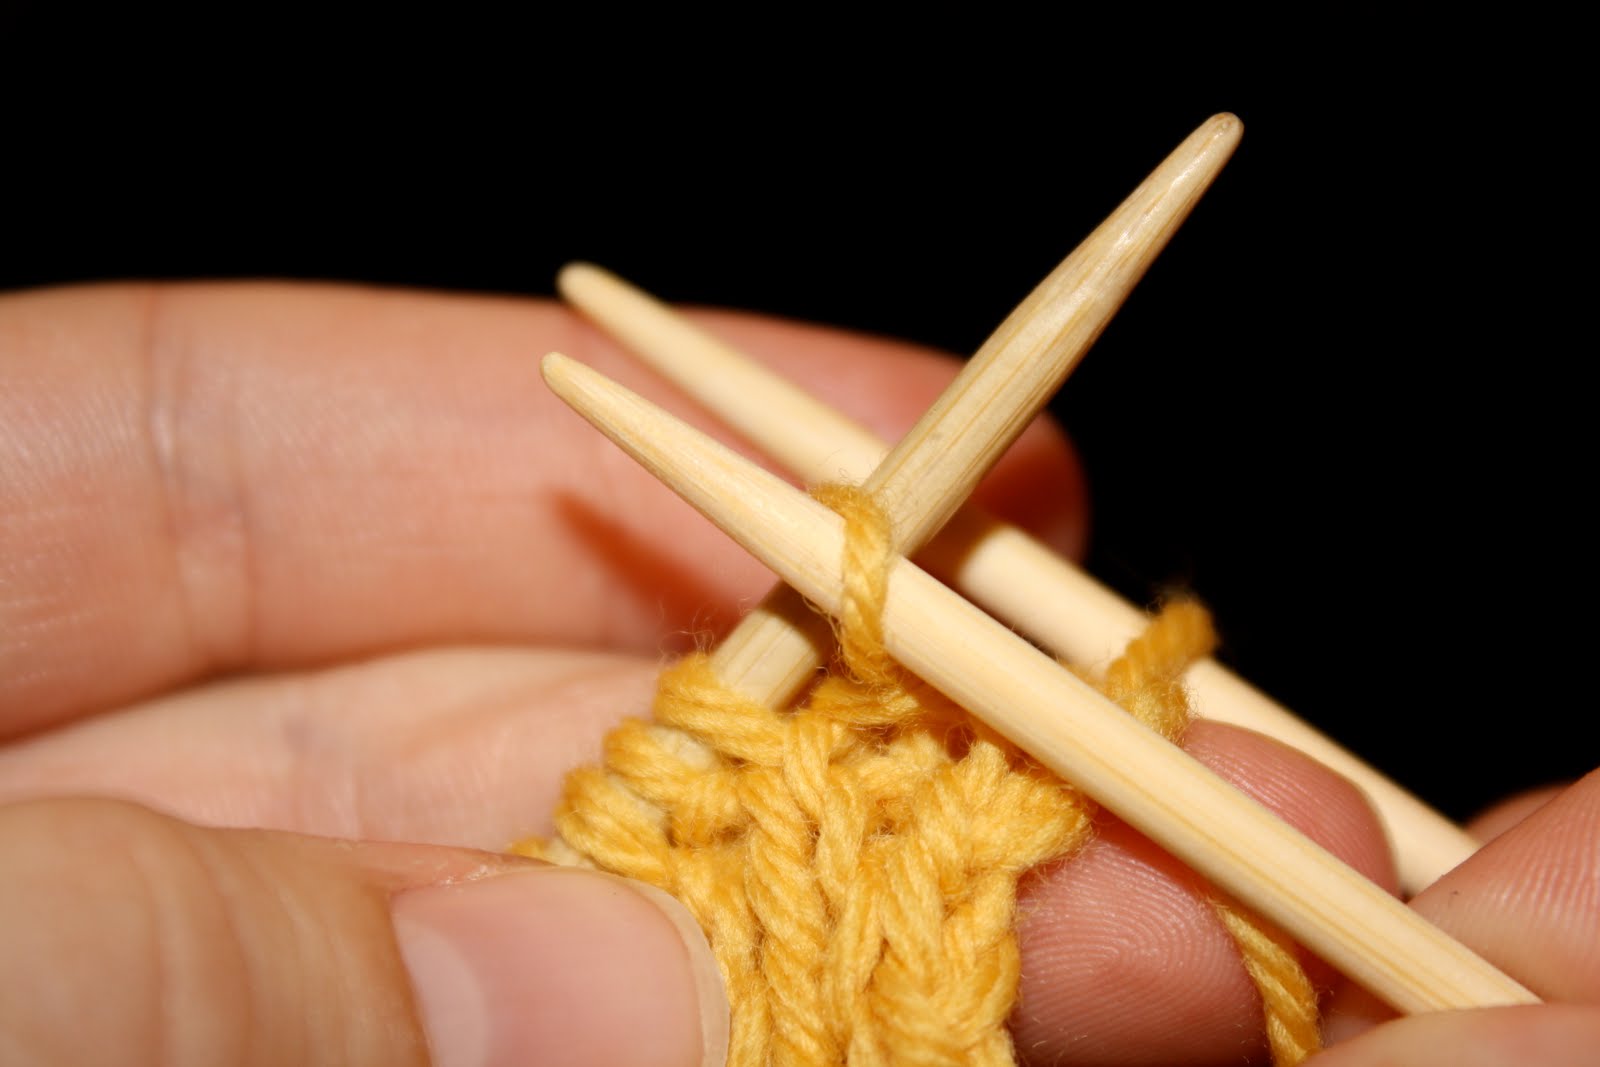
This got me thinking about how it's fairly standard practice to reinforce the back of the heel when knitting socks. But how? The most common way that I've encountered to reinforce the heel is to work every right side row of the heel flap (Slip 1, Knit 1) repeated to the end of the row, and simply purl the wrong side rows. It looks a little something like this...


The result is a firm fabric, slightly thicker than stockinette, with every other column of stitches backed up by a strand of yarn carried along behind it. It's easy to see why this is the most popular method of reinforcement--nothing difficult, no extra needles, yarn, or sewing involved. But what if you want the simplicity of stockinette?

I found myself in this situation with the socks I'm knitting that have been dubbed the "Powder 8's". I chose a variation on what Nancy Bush calls the "Balbriggan Heel" in Folk Socks--a simple heel with no short rows (but with Kitchner stitch--probably an equal trade off) that complemented the cables I wanted to run down the heel flap.


The most straightforward way to reinforce a heel flap done in stockinette is to hold two strands of your sock yarn. Pros: no additional materials required and no 'post mortem' work required (i.e. reinforcement occurs during normal knitting). Cons: Changes gauge and may be overly thick.

A variation on this method is to add a strand of nylon thread instead of a second strand of yarn, and this eliminates the cons of changing the gauge and increasing the thickness. Unfortunately, it also negates the pro of no additional materials required.

Another way to reinforce your stockinette heel flap is to again use two strands of your sock yarn and alternate the strands of yarn for each stitch (i.e. Yarn A used for stitch 1, Yarn B used for stitch 2, Yarn A used for stitch 3, Yarn B used for stitch 4, etc.). Pros: no additional materials required, no 'post mortem' work, and theoretically no change in gauge. Cons: all of the difficulty and tedium associated with two color-knitting without the benefit of two-colors--stitch non-uniformity will be more obvious.

The last method for your consideration is to thread yarn through alternating purl bumps on the wrong side of the heel flap. This is the method I settled on for my pair of the Powder 8's. Choose where the area you want to reinforce, and using a tapestry needle, thread a strand of leftover sock yarn under a column of alternating purl bumps:


When you reach the top of the area that needs reinforcement, turn around and thread through the next column of purl bumps, threading through the rows that you skipped on the previous round:

Contrasting color used for illustration--use yarn of same color if available.


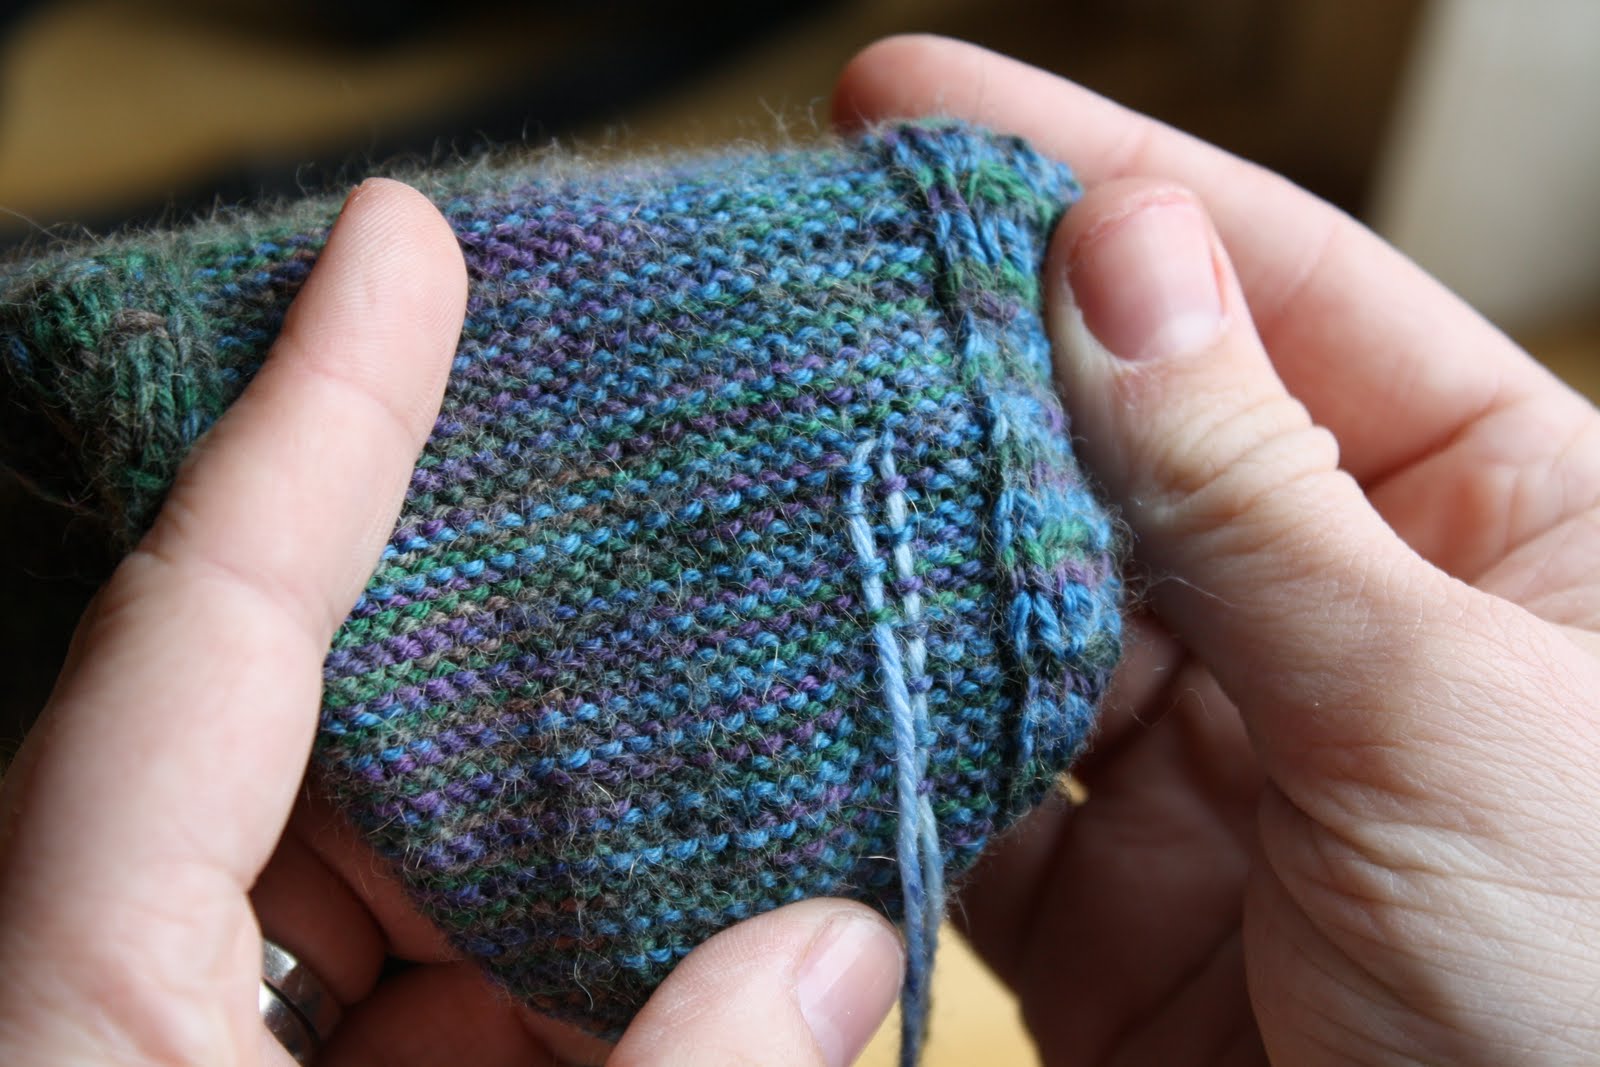
Repeat until desired area is covered. Pros: doesn't change gauge or stitch uniformity. Cons: requires 'post-mortem' work--if you hate weaving in yarn ends, this isn't the technique for you.

I think I may even start reinforcing all the main points of contact on the foot--the back of the heel, the bottom of the heel, and the ball of the foot. My Smartwools affirm wear on the ball as well:


I guess I should be impressed that they've lasted this long. Still, I'll miss them when they disintegrate off of my feet.

Monday, November 15, 2010

It's Halloween! Costume? Crap.

Blogger's note: This post has been brewing in the queue for two weeks while I begged around for a photo of my costume. But rest assured! It was totally....not worth the wait. Sorry.

Halloween is one of the best holidays. It signals that fall has definitely arrived and brings with it carved pumpkins (with their delicious baked seeds), apple cider (rum optional) and enjoyable scares. I'll never forget the Halloween that a neighbor came after my mom with a chainsaw. Turns out it was a prank and he'd removed the chain, but I'm pretty sure she had to change her underwear nevertheless.

It's also an excuse to wear a costume, which is simultaneously an opportunity for fun and creativity and a hideously daunting task. My perpetual goal is to spend as little money as absolutely possible without looking like the kid in gradeschool who's mom was too cheap to buy a costume but also couldn't sew. You know, he'd be wearing a garbage bag with armholes cut into it and claim to be a 'raincloud' or some shit.

As per usual, I'd made no plans for what to do and Halloween was only a couple of days away. I wandered the house trying to glean inspiration from household items. Women have an immediate costume advantage in the sense that they can take an every day occupational uniform, and simply make it slutty. It's the sexy 'blank' concept, as in sexy nurse, sexy fireman, or sexy garbageman (hey, maybe that garbage bag could work after all!). After brief consideration, I determined that a) I haven't been a college undergraduate in quite some time, and b) it's too damn cold in WI to be skanky for Halloween. I needed maximum coverage.

Where does one turn for trivial ideas and information? To the internets! I found myself on the 'Family Fun' website, which had a lot of cute ideas for kids costumes (in an attempt to avoid the 'sexy' moniker, I was reduced to looking at ideas directed at children). The option of jellyfish cried out to me the loudest for two reasons: it allowed me to wear warm clothing and I already had all of the materials.

I was especially excited to incorporate some yarn that had previously been languishing for almost a year with no prospects. Some of my relatives bought me this big-ass skein of yarn (or BASOY for short) for Christmas last year, and while I think it rocks...I'm not entirely sure what to do with it.

Figure of person added for scale.


Totally tentacles, right? The whole shebang took about 15 minutes to put together, I was warm and happy that night, and the BASOY finally started to find a home. Happy (extremely belated) Halloween!

Monday, September 20, 2010

Adventures in blocking

Confession: I'm terrible at blocking my knitted work. Explanation for my non-knitted readers - blocking is a 'finishing' process for a knitted item. When you knit something by hand, the stresses in the fabric may not be entirely equal; this can result in curling, twisting, and any other number of unfortunate side effects that can make your lovely item look like a wrinkled old piece of garbage. Blocking usually involves wetting the item with water, pinning it in the desired finished dimensions, and letting it dry. Doesn't this seem like a stupid part of the knitting process to be bad at? Does anyone else consistently have trouble with blocking, or is it just me??

I came to a sudden realization last Wednesday: the wedding that I was knitting Mystery Wedding Project for was only three days away. Now I'd long given up on getting MWP done in time, but I did want to finish my shawl so I could show off the hand-knits a little bit. All I needed to do was block.

I collected some advice from some of the ladies in the shawl-KAL, and based on their suggestions a (half-baked) plan began to brew - instead of using a million pins, I would make a wire frame. First, I picked up some low-gauge stainless steel wire from the local hardware store:


I washed the heck out of it, since it probably had residual oil and grime from the production process. I couldn't resist playing with it a little bit:


Fun for a girl and a boy! And a dog, apparently.

The first setback was the fact that the wire did not want to keep any shape but a coil. I applied my materials engineering knowledge to something useful (for once): the wire needed to be 'work hardened' before it would be useful. Basically, work hardening is the concept that a metal becomes stronger when you do 'work' on it.

In this case, I used my hands to bend the wire back and forth, and when those got tired:


Wrenches! I used the wrenches to pull small sections of the wire straight. With the wire primed, I bent it into a rectangle measuring 60" x 20". I fed the shawl onto the frame in a 'running stitch' style - basically passing the wire over/under the selvage stitches:


Voila!


I did break down and use a few pins to hold the frame steady.


I moistened the fabric using a spray bottle filled with water. It dried within the course of a few hours.

Did it work? It did!


I couldn't really believe I had produced something so delicate (me = bull in a china shop).

Would I do it again? I would, but with the caveat that I'm really glad that I don't have to do the work hardening of the wire again--it took a while, and if I was to do it again, I would work with the wire long before I was ready to actually block the shawl, just to break up the tedium a little bit.

Friday, August 20, 2010

Tubular cast-on: in the round

Recently, I got a comment on my tutorial for the tubular cast-on asking if it could be done in the round, and how so. I wasn't sure, but my curiosity was piqued. I love knitting sweaters and hats in the round, both cases where you'd like to have a nice finished edge for any ribbing. So Marina, I hope you are checking back every now and then for an answer, because I present to you...

Tubular cast on: in the round


With a waste yarn in contrasting color, cast-on half the number of stitches you need using the chained cast-on. If your pattern calls for an odd number of stitches, add one to that number and then divide by two.


Switch to your main yarn. Purl one row.


If you're using double pointed needles, at this point distribute stitches evenly (as possible) between four needles.


Join in the round, and purl three more rows. The wrong side will be facing outward.


Purl one stitch.


Yes, we know how to do that. Moving on.

Now you're going to insert the right-hand needle into the purl bump from the first row. It's intermixed with the waste yarn. This is why using contrasting yarn colors is key.

Purl bump circled in green.

Insert RH needle from top to bottom (front of the stitch to the back):


Place the stitch on the LH needle from bottom to top (back of the stitch to the front). Knit the stitch. That's two stitches tubularly cast-on! Repeat (purl one, pick up 'purl bump', knit 'purl bump') to the last stitch. If you wanted an odd number of stitches, purl the last stitch and you're done. If you wanted an even number of stitches, purl the last stitch and also knit the last purl bump. It will be a selvage edge, so it may be pulled fairly tight, and you'll have to work to get your needle in there. You should get something along these lines:


Do a few rows of K1, P1 ribbing, then you can start to carefully take out the waste yarn. If you undo the last stitch cast-on with the waste yarn, you should be able to pull the rest out by tugging on the end (which is what makes the chained cast-on a sweet provisional cast-on):


Voila! Tubular cast-on in the round.

Marina also inquired about the tubular cast-on with k2p2 ribbing. My instinct says that you would proceed normally with the exception of purling 2 and knitting 2 purl bumps instead of 1 and 1. I'm not sure if that would work out, so it's an investigation for another day....

Wednesday, May 19, 2010

Kitchener bind-off

After my love-affair with the tubular cast-on, I have been remiss to re-try its counterpart: the dreaded Kitchener bind-off. I learned to do the Kitchener stitch (aka 'grafting' or 'weaving' seams invisibly) via the TechKnitter and her 'easier' technique. It worked well for seaming up the toes of socks; when I applied it as a bind-off for the bottom of a sweater, it became, how do you say? A hot mess. I finally ripped off the metaphorical Kitchener Band-Aid last night, but this time I tried the 'traditional' method of Kitchener for the bind-off. Here's how it goes...

Kitchener bind-off


Note: This bind-off works for K1P1 ribbing only, and you must have an even number of stitches.

So you've reached the end of your ribbing, and you're ready to bind-off. The first thing you need to do is get yourself a couple of dpns or circulars in the needle size that you're using, as well as a tapestry needle.

Step 1: Slip the first stitch (a knit stitch) purl-wise onto one of the dpns/circs:


Step 2: Slip the next stitch (a purl stitch) purl-wise onto the other dpn/circ:


Make sure that the needle with the knit stitches is closest to you, and the one with the purl stitches is in the back (unlike the photo...tsk tsk).

Repeat steps 1 and 2
until you have all the knit stitches on one needle, and all the purl stitches on the other:


Whichever way you turn it, knit stitches should be facing the outside. We'll call the one with the knit stitches on it the 'front needle', and the one with purl stitches on it the 'back needle'.

Now, cut your yarn leaving a tail three times the length of the work that you're binding off, plus an additional 12" for buffer and weaving in purposes. Thread the loose end onto the tapestry needle.

Step 3:
Hook the needle through the first stitch on the front needle as if you were going to purl it:


Pull the yarn through the stitch until the yarn is snug (not tight). Leave the stitch on.

Step 4:
Hook the needle through the first stitch on the back needle as if you were going to knit it:


Pull the yarn through the stitch until it is snug (not tight). Leave the stitch on.

----------------------------------------------


You've set up the first two stitches, now comes the steps that you will repeat.

Step 5: Hook the needle through the first stitch on the front needle as if you were going to knit it:


Pull the yarn through the stitch until it is snug (not tight). Hook the needle through the second stitch on the front needle as if you were going to purl it:


Pull the yarn through the stitch until it is snug (not tight). Drop the first stitch off of the front needle (circled in green):


Step 6: Hook the needle through the first stitch on the back needles as if you were going to purl it:


Pull the yarn through the stitch. Hook the needle through the second stitch on the back needle as if you were going to knit it:


Pull the yarn snugly through the stitch. Drop the first stitch off of the back needle (circled in green):


Phew. You just bound-off two stitches. Repeat steps 5 and 6 until there are two stitches left, one on each needle, like so:


Step 7: Hook the needle through the only stitch on the front needle as if you were going to knit it:


Pull the yarn through snugly, drop the front needle stitch off.
Step 8: Hook the needle through the only stitch on the back needle as if you were going to purl it:


Pull the yarn through snugly and drop the back needle stitch off.


And you're done with 8 simple steps! Guaranteed fun! (Guarantee void everywhere.)

General advice: continually monitor your progress and adjust the tension of the bind-off. Stretch it out after every couple of steps to make sure the yarn is seated correctly and that nothing is tangled up.

I find that using the traditional method, my bind-off is very loose, so I had to go through and tighten it to my liking after every repeat of steps 5 and 6. It takes longer, but the result is worth it.

Try to make sure that the working yarn is always going over the work, but below the needles (so as not to create extra loops). Understanding this takes some practice (and cursing. So practice your cursing too).

The traditional technique is easier and more intuitive to me, but it may not be for you. If this method pisses you off too badly for words, try out the TechKnitter's method (linked in the first paragraph). This is after you've retrieved your work from the window you threw it out of and apologized to the neighbors for introducing their kids to words they'd never dreamed of, of course. In all seriousness, the Kitchener bind-off isn't hard, it just takes a lot of focus and patience. It works best if you do it somewhere quiet with no distractions. Since I'm the type of person that likes to drive to work while grilling hot-dogs and giving myself a sponge bath, that much focus is sometimes hard to obtain.

Friday, May 14, 2010

Stitch holder jerry-rig

As seems to happen almost every time I travel, I found myself missing an item needed to continue my craftiness. This time: stitch holder. Usually, I just use scrap yarn as a stitch holder, due to laziness and cheap-ness (I mean, frugality). However, all of the yarn I was using was agglomerated into one big ball--no dice. I searched for solutions in my surroundings. The first thing I spied:

Aha! Maybe some twine? Wire?

I didn't think that something mysterious and sticky called 'Sexauer' would be of any help--but my inner 13-year-old boy did find it amusing. The search continued. In any lab that's been around for a while, even the most immaculate of them tend to accumulate a lot of junk. I struck gold with this drawer:

Not gold, actually. Copper.

Heavy gauge unplied copper wire? Dear diary--jackpot. Copper is very ductile: you can often bend it with no equipment other than your hands.

I started with a straight piece:

Bent it in half, one side a bit longer than the other, then curled the longer side into a loop:

Readjusted by original bend so that I could easily move the unbent side in and out of the loop, but with a little poking through so the stitches would be trapped.

I also filed the ends a bit, just to make sure they wouldn't snag. Here it is in action:

I was feeling quite pleased with myself, but not really seeing any advantage to this as opposed to just a strand of yarn. Then I made an error (naturally) and had to pull the work back out to before where I used the stitch holder--bingo. It was so much easier to get the stitches on and off using a rigid holder, rather than yarn. They slid off like buttah. It's cliche, but necessity is the mother of invention.