Showing posts with label cast-on. Show all posts

Friday, August 20, 2010

Tubular cast-on: in the round

Recently, I got a comment on my tutorial for the tubular cast-on asking if it could be done in the round, and how so. I wasn't sure, but my curiosity was piqued. I love knitting sweaters and hats in the round, both cases where you'd like to have a nice finished edge for any ribbing. So Marina, I hope you are checking back every now and then for an answer, because I present to you...

Tubular cast on: in the round


With a waste yarn in contrasting color, cast-on half the number of stitches you need using the chained cast-on. If your pattern calls for an odd number of stitches, add one to that number and then divide by two.


Switch to your main yarn. Purl one row.


If you're using double pointed needles, at this point distribute stitches evenly (as possible) between four needles.


Join in the round, and purl three more rows. The wrong side will be facing outward.


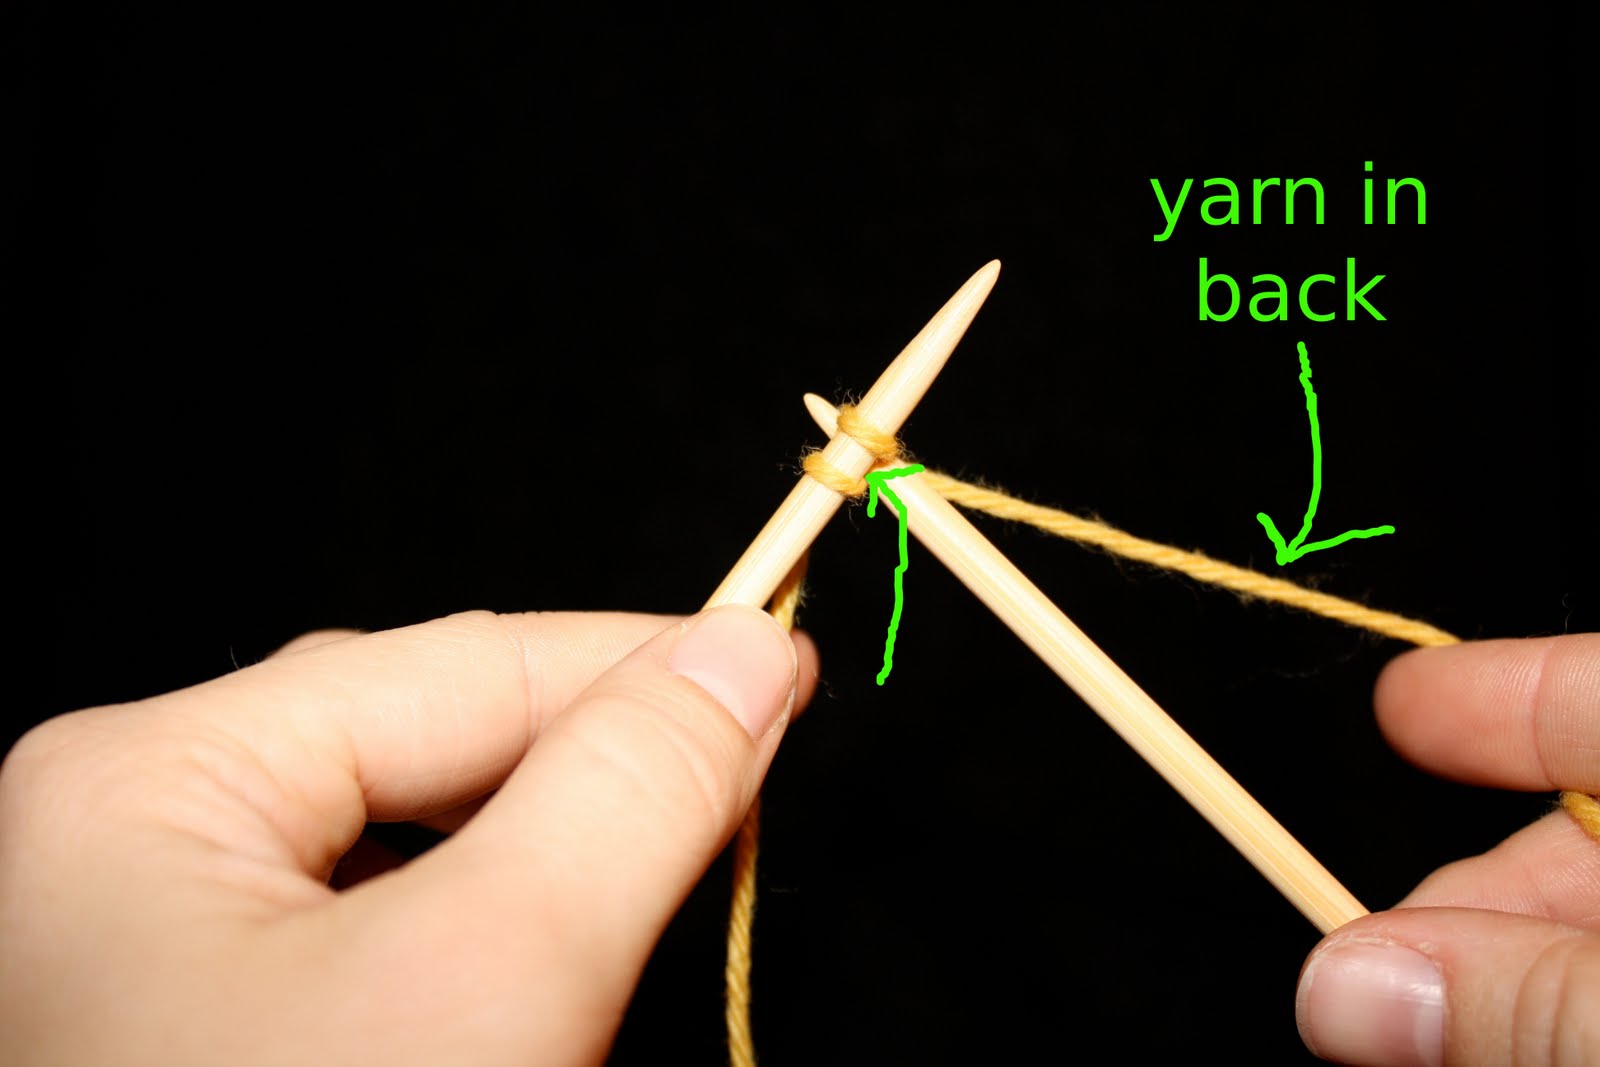
Purl one stitch.


Yes, we know how to do that. Moving on.

Now you're going to insert the right-hand needle into the purl bump from the first row. It's intermixed with the waste yarn. This is why using contrasting yarn colors is key.

Purl bump circled in green.

Insert RH needle from top to bottom (front of the stitch to the back):


Place the stitch on the LH needle from bottom to top (back of the stitch to the front). Knit the stitch. That's two stitches tubularly cast-on! Repeat (purl one, pick up 'purl bump', knit 'purl bump') to the last stitch. If you wanted an odd number of stitches, purl the last stitch and you're done. If you wanted an even number of stitches, purl the last stitch and also knit the last purl bump. It will be a selvage edge, so it may be pulled fairly tight, and you'll have to work to get your needle in there. You should get something along these lines:


Do a few rows of K1, P1 ribbing, then you can start to carefully take out the waste yarn. If you undo the last stitch cast-on with the waste yarn, you should be able to pull the rest out by tugging on the end (which is what makes the chained cast-on a sweet provisional cast-on):


Voila! Tubular cast-on in the round.

Marina also inquired about the tubular cast-on with k2p2 ribbing. My instinct says that you would proceed normally with the exception of purling 2 and knitting 2 purl bumps instead of 1 and 1. I'm not sure if that would work out, so it's an investigation for another day....

Wednesday, April 21, 2010

Tubular cast-on

Now for the pay-off to the chained cast-on. It's tubular! The tubular cast-on is GORGEOUS for ribbing, and stretchy to boot. I have a new favorite...but it does take extra effort, compared to your standard cast-on. So let's check it out.

Tubular cast-on

With a waste yarn in contrasting color, cast-on half the number of stitches you need using the chained cast-on. If your pattern calls for an odd number of stitches, add one to that number and then divide by two. Switch to your main yarn. Purl one row, knit one row, twice (total of 4 rows):


You're ready to knit on the wrong side. My fabric is curling under in this photo, which is why it looks funky.

Purl one:

Yes, we know how to do that. Move on.

Now you're going to insert the right-hand needle into the purl bump from the first row. It's intermixed into the waste yarn. Here's where your contrasting yarn colors are key.

Purl bump is circled.

Insert RH needle from top to bottom (can also be described as from the front of the stitch to the back):


Place the stitch on the LH needle from bottom to top (back of the stitch to the front). Knit the stitch:

Two stitches successfully tubularly cast-on! That's a mouthful.

Repeat to the last stitch. If you wanted an odd number of stitches, purl the last stitch and you're done. If you wanted an even number of stitches, knit the last stitch, as well as the last purl bump. It will be a selvage edge, so it may be pulled fairly tight, and you'll have to work to get your needle in there. Here's what we've got so far:


Do a few rows of K1, P1 ribbing, then you can start to carefully take out the waste yarn. If you undo the last stitch cast-on with the waste yarn, you should be able to pull the rest out by tugging on the end (which is what makes the chained cast-on a sweet provisional cast-on). Check it out:


You'll notice that part of the waste yarn ends up in the tube you created with the cast-on. You can carefully pull it out. If you wanted an elastic band in your garment for extra pull on the edge, this is the ideal spot. You can thread it in post-mortem, or you can use the elastic as your 'waste yarn' if it is an appropriate shape.

And here's the finished product!


I *heart* this so much. It's gorgeous and definitely worth the extra time spent.

Tuesday, April 20, 2010

Chained cast-on

Back to our regularly scheduled tutorial. I hated this one as purely a cast-on, it's relatively ugly and difficult to do evenly. So why the hell would you want to learn it? Because it's a necessary step for the tubular cast-on, which is way cool and has nothing to with surfers or outdated 80's lingo, just an awesome finished edge. More on that tomorrow. But for now, brace yourself: the chained cast-on is coming for you. And it totally demands that you have a crochet needle similarly sized to the needles you plan to use. How presumptuous.

Chained cast-on

We start with our old friend, the slip knot. Situation normal, right? But this time, we're using waste yarn, in a contrasting color to the yarn we plan to use.


Place the slip knot onto the crochet needle.

Crochet needle in right hand, knitting needle in left hand. It's like a crafting yin and yang.


Hold the yarn in your left hand (along with your knitting needle) and make sure the yarn is running under the knitting needle to the crochet needle. Hook the yarn with your crochet needle, pulling it over the knitting needle:


Then continue pulling it through the loop on the crochet needle:


Tighten down the stitch by pulling on the yarn your left hand:

Voila! One stitch cast-on.


Repeat, starting with the step that begins "Hold the yarn in your left hand.." until you've cast-on the desired number of stitches.

Here's what it looks like after you've cast-on a few (not to be confused with tying on a few):


Now you can go ahead and use this as your cast-on, but I didn't do all of that work (crocheting is flipping hard, apparently) for a crappy edge.

Tomorrow: How are we going to use this to facilitate a super awesome cast-on?

Wednesday, April 7, 2010

Picot cast-on

I haven't abandoned the stretchiness experiment; I'm starting to get into cast-ons & bind-offs that I haven't tried before. Today I want to chat about the picot cast-on. I've historically avoided picot in general, believing it to be too twee for my taste. When I hear 'picot', I think of a baby bonnet or a doily or something else equally cutesy. My knitting is not 'cutesy'. My knitting is bad-ass, hardcore, and cutesy--wait! Scratch that last one. Let me start over.

There isn't a lot of good information about the picot cast-on floating around the internet, so this is a how-to that I really wanted to write. The basic concept of picot is adding extra stitches for decorative purposes, making a 'bobble'. There are many variations depending on how large you want the decorative part to be. What I describe here is the least obvious picot cast-on, though it will ruffle a bit. I learned how to do it from The Knitters Book of Finishing Techniques.

Picot cast-on

Start with your trusty slip-knot:

This is your first stitch.


Cast-two more stitches using the cable cast-on.

Now you have a total of three stitches on the left-hand needle. (I don't know why my right-hand needle is in there-finishing up the last cast-on, I guess?)


Knit two stitches.

One stitch left on LH needle, two on RH needle


Bind-off one stitch, like the conventional knit bind-off; slip the first stitch on the over the second stitch on the RH needle using your LH needle, then drop it off of the LH needle:


Place the stitch remaining on your RH needle onto your LH needle by inserting your LH needle through the underside of the stitch:


This is your first picot cast-on stitch. To continue, cast-on one stitch with the cable cast on. Make sure your LH needle is going between the stitches for the cable cast-on, rather than through any loops. Then repeat the procedure starting back at "Knit two stitches." until you have cast-on the amount needed for your piece. It'll look something like this:


And the finished product, on k1p1 ribbing, looks like this:


I was pleasantly surprised! I really like it, and I think it's very conducive to allowing the ribbing to stretch. I'm declaring picot a front-runner for a cast-on with stretch, and am glad to have overcome my prejudices against it.

Thursday, April 1, 2010

Cable cast-on

Adding to my stretchiness swatch collection, last night I used the cable cast-on. I've used this one a few times, and was(and still am, though slightly less so) skeptical about it's ability to stretch. This is a very firm cast-on, but I think also a very neat one. What's that? You'd like to see how it's done? I thought you'd never ask.

Cable cast-on:


Step 1: Cut a hole in the box. Wait, oops, those are instructions for something else.

Step 1: Cast-on two stitches using the knitted cast-on

This will be your left-hand (LH) needle.


Step 2: Insert the tip of your right-hand (RH) needle (the one with no stitches yet) in between the two stitches from front to back. Hold the working yarn to the back.

Make sure to insert needle between the stitches, not through either of them. I've tried to illustrate this with the pathetic green arrow seen above.


Step 3: Working yarn is still in the back, right? Wrap the yarn counter-clockwise around the RH needle.


Step 4: Bring the tip of the RH needle down and back through the two stitches, pulling the wrapped yarn with it.


Step 5: Now you have a stitch on the RH needle. Slip it to the LH needle by inserting the tip of the LH needle through the underside of the loop on the RH needle. Slip it off of the RH needle.


Now you have a successful cable cast-on stitch.

Booyah!


Repeat steps 2 through 5 until you have cast-on as many stitches as you need.

It'll look something like this:


And something like this when it's done with k1p1 ribbing:


These were cast-on with a needle three times larger than that used for the ribbing. This is a very firm cast-on. I would always do it with a needle at least a size larger than the one you intend to you; it's easy to do it way too tight. I'm willing to bet it would still look nice using a needle up to 5 sizes larger than the working needle. I've heard tell of a 'ribbing cable cast-on', so I wanted to introduce the easy one and then contrast it to the ribbing one. One would think that the ribbing one would be better for ribbing (it is in the title), but I want to see for myself.

Tuesday, March 30, 2010

Knitted cast-on

In the course of making the stretchiness test swatches, I decided to take some photos of the cast-on/bind-off processes. When I'm learning a task, I like to look at pictures. There are a lot of good videos with the same information, but my learning style doesn't seem suited to the video medium. I figured just in case there was one other weirdo like me out there, I'd be glad to help. Also, my copilot has a nice camera that he rarely uses. Might as well take some glamor shots.

This particular cast-on is my bread and butter. Part of the stretchiness experiment is just to get me to branch out and try some other methods. It's a great one to teach to a first-time knitter, because it's almost the same as the knit stitch so you're killing two birds with one stone (although I don't know if I'd want to learn knitting from a bird killer. You should probably try to cut down on that).

The knitted cast on:


Start with a slip knot:

This is your first stitch.


I usually leave a good 6" tail on the non-working side of the knot for weaving in later.

It doesn't matter which way you put it on the needle.


Put the needle with the stitch on it in your left hand, and the other in your right hand. Keeping the yarn behind both needles, insert the needles in your right hand knitwise (from underneath, going upwards) into the loop, from the front to the back.

If 'front to back' doesn't make sense, just make sure the tip of the RH needle ends up behind the LH needle.


Take the working yarn in your right hand (it's still behind the needles, right?) and wrap it counter clock-wise around the LH needle, bringing it between the two needles:


Bring the tip of the RH needle down and back out the loop, catching the yarn you just wrapped around the RHN:

Creates a new loop on the RH needle.


Slip the new loop from the RH needle to the LH needle; LH needle goes from underneath upward through the loop on RH needle:


Now you have two stitches cast-on:

Booyah!


Repeat (excepting the slip-knot part, of course) until you have the amount of stitches you need.


Here's what it looks like on a ribbed swatch:


It's a bit messier than usual since I cast-on using a needle 3-sizes larger than the one I made the swatch with (to allow it to stretch farther). That is a drawback to this cast-on: it's not super stretchy, and the only way to compensate is to do it loosely. I don't trust myself to do it loosely with any kind of uniformity, so I just use needles 2-3 sizes larger what will be used for the body. I've reached at least one conclusion: I'm not going to be a hand model any time soon.