Cable cast-on:
Step 1: Cut a hole in the box. Wait, oops, those are instructions for something else.
Step 1: Cast-on two stitches using the knitted cast-on

This will be your left-hand (LH) needle.
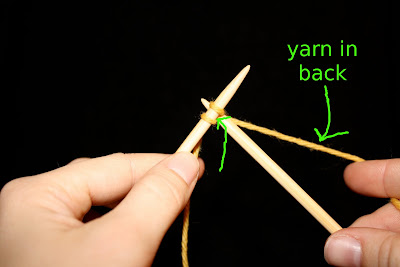
Step 2: Insert the tip of your right-hand (RH) needle (the one with no stitches yet) in between the two stitches from front to back. Hold the working yarn to the back.

Make sure to insert needle between the stitches, not through either of them. I've tried to illustrate this with the pathetic green arrow seen above.
Step 3: Working yarn is still in the back, right? Wrap the yarn counter-clockwise around the RH needle.

Step 4: Bring the tip of the RH needle down and back through the two stitches, pulling the wrapped yarn with it.

Step 5: Now you have a stitch on the RH needle. Slip it to the LH needle by inserting the tip of the LH needle through the underside of the loop on the RH needle. Slip it off of the RH needle.

Now you have a successful cable cast-on stitch.

Booyah!
Repeat steps 2 through 5 until you have cast-on as many stitches as you need.
It'll look something like this:

And something like this when it's done with k1p1 ribbing:

These were cast-on with a needle three times larger than that used for the ribbing. This is a very firm cast-on. I would always do it with a needle at least a size larger than the one you intend to you; it's easy to do it way too tight. I'm willing to bet it would still look nice using a needle up to 5 sizes larger than the working needle. I've heard tell of a 'ribbing cable cast-on', so I wanted to introduce the easy one and then contrast it to the ribbing one. One would think that the ribbing one would be better for ribbing (it is in the title), but I want to see for myself.

No comments:
Post a Comment