Thursday, April 1, 2010

Cable cast-on

Adding to my stretchiness swatch collection, last night I used the cable cast-on. I've used this one a few times, and was(and still am, though slightly less so) skeptical about it's ability to stretch. This is a very firm cast-on, but I think also a very neat one. What's that? You'd like to see how it's done? I thought you'd never ask.

Cable cast-on:


Step 1: Cut a hole in the box. Wait, oops, those are instructions for something else.

Step 1: Cast-on two stitches using the knitted cast-on

This will be your left-hand (LH) needle.


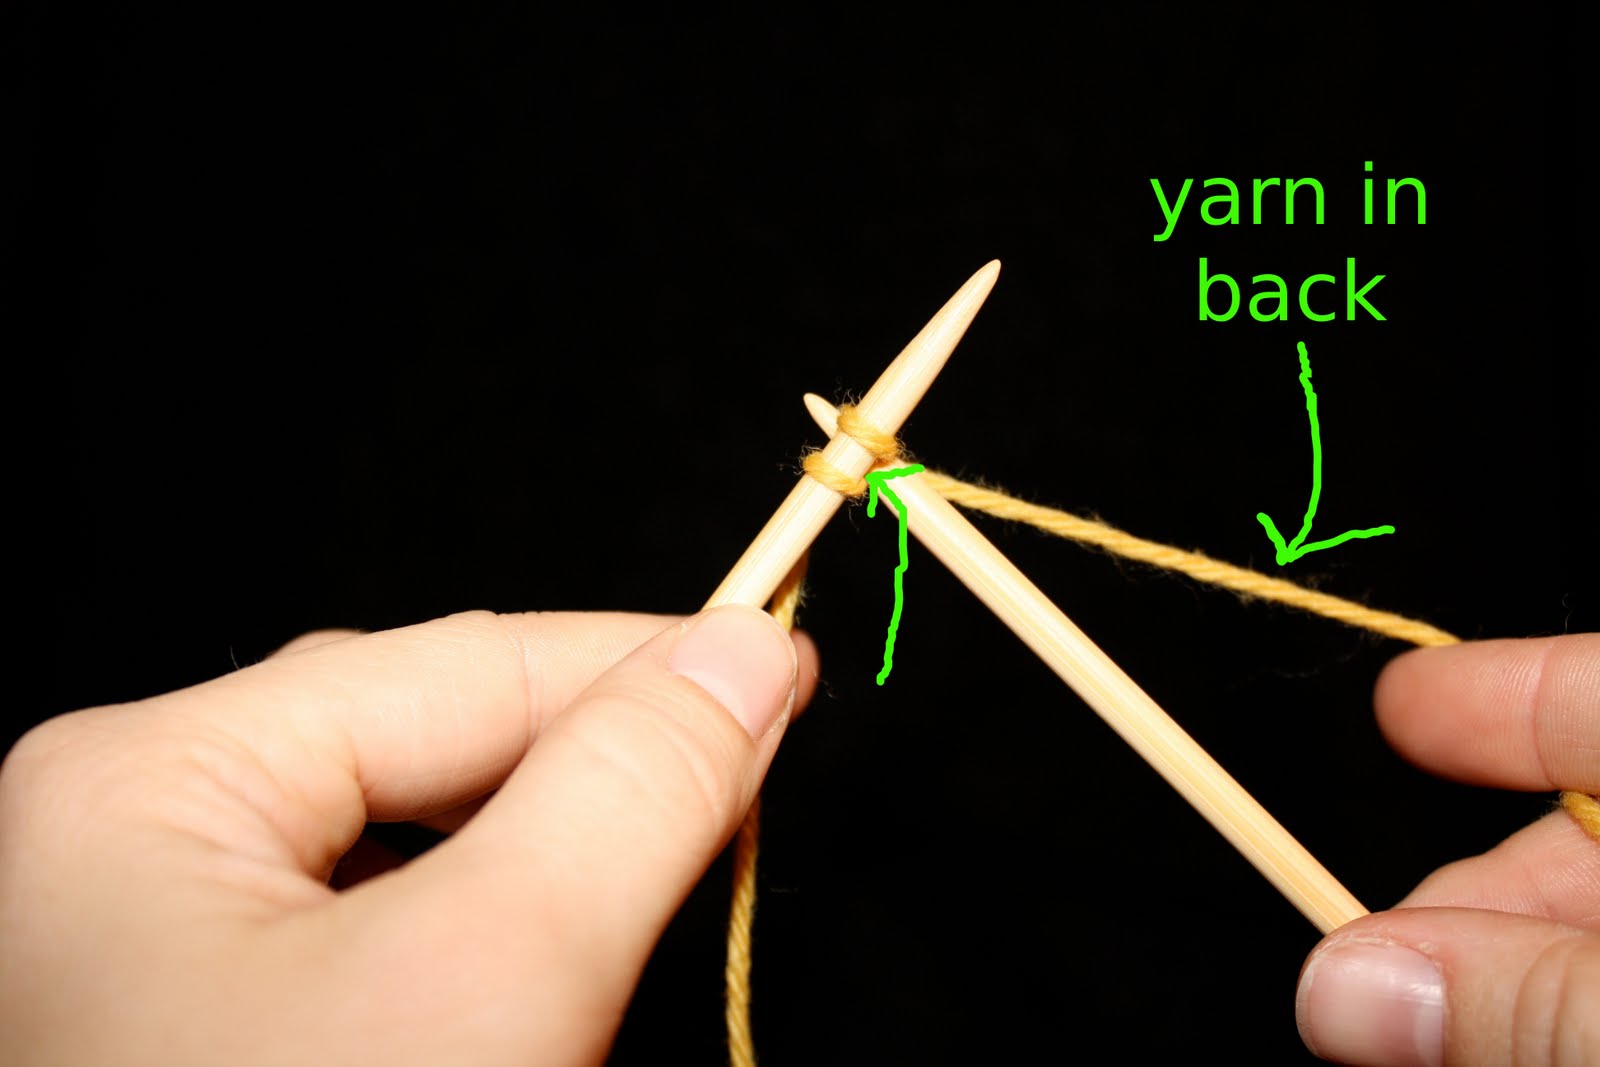
Step 2: Insert the tip of your right-hand (RH) needle (the one with no stitches yet) in between the two stitches from front to back. Hold the working yarn to the back.

Make sure to insert needle between the stitches, not through either of them. I've tried to illustrate this with the pathetic green arrow seen above.


Step 3: Working yarn is still in the back, right? Wrap the yarn counter-clockwise around the RH needle.


Step 4: Bring the tip of the RH needle down and back through the two stitches, pulling the wrapped yarn with it.


Step 5: Now you have a stitch on the RH needle. Slip it to the LH needle by inserting the tip of the LH needle through the underside of the loop on the RH needle. Slip it off of the RH needle.


Now you have a successful cable cast-on stitch.

Booyah!


Repeat steps 2 through 5 until you have cast-on as many stitches as you need.

It'll look something like this:


And something like this when it's done with k1p1 ribbing:


These were cast-on with a needle three times larger than that used for the ribbing. This is a very firm cast-on. I would always do it with a needle at least a size larger than the one you intend to you; it's easy to do it way too tight. I'm willing to bet it would still look nice using a needle up to 5 sizes larger than the working needle. I've heard tell of a 'ribbing cable cast-on', so I wanted to introduce the easy one and then contrast it to the ribbing one. One would think that the ribbing one would be better for ribbing (it is in the title), but I want to see for myself.

Wednesday, March 31, 2010

Infinite test swatch deux

So, I made a two color infinite test swatch. And...well, see for yourself:


Ehhhhhhhhhhhhhhhhhh. I almost didn't want to tell you about it. First, the colors are horrible, I know. I know. I was trying to use up some scraps. I'm trying not to let that "color" my opinion (see what I did there?). But the cables still aren't doing what I want them to. Let's go in for a closer look:


I don't want it to look like cabling, I want it to look like a woven basket. Here's the rub-I don't know if the cables are strained because 4 stitches are kind of a lot to exchange and expect the tension not to show, or if it's just my lousy two-color work. Since I was just making a small swatch, I had to use double pointed needles. Kids, don't try this at home. I did a horrible job maintaining the tension of my floats. If this was a Project Runway challenge, Tim Gunn would have come over to my station, put on his concerned face, and note that "There's a LOT going on here." Well I'm sorry Tim, when you've got five needles and two strands of yarn in play, it's hard to keep track of what the hell is going on. I think I need to make a bigger swatch, one were I can use circular needles and not pull the floats ridiculously tight half of the time. Or maybe I need a different strategy. Or both. Argh, this flies in the face of my swatch making sensibilities (i.e. I hate making them). And why is Luke Wilson all bloated and pushing AT&T? Why am I out of Diet Coke?? WHY MUST EVERYTHING BE SUCH A STRUGGLE??!

It's not all bad though, now that I think of it. On our way back to the office after lunch, we had to walk through the 'protest quad' - people schlepping everything from petitions to save endangered sea slime to seeking new members for their religion, the Church of Oprah Winfrey. But today, there was a girl with no agenda to push but chocolate cupcakes for 50 cents. I was in the "we don't want any" zone and almost passed it up. Best 50 cents I've spent in quite a while. I was a little worried that being Berkeley, they might be "special" cupcakes, but I figure, hey, it's just more bang for my half-buck.

Tuesday, March 30, 2010

Knitted cast-on

In the course of making the stretchiness test swatches, I decided to take some photos of the cast-on/bind-off processes. When I'm learning a task, I like to look at pictures. There are a lot of good videos with the same information, but my learning style doesn't seem suited to the video medium. I figured just in case there was one other weirdo like me out there, I'd be glad to help. Also, my copilot has a nice camera that he rarely uses. Might as well take some glamor shots.

This particular cast-on is my bread and butter. Part of the stretchiness experiment is just to get me to branch out and try some other methods. It's a great one to teach to a first-time knitter, because it's almost the same as the knit stitch so you're killing two birds with one stone (although I don't know if I'd want to learn knitting from a bird killer. You should probably try to cut down on that).

The knitted cast on:


Start with a slip knot:

This is your first stitch.


I usually leave a good 6" tail on the non-working side of the knot for weaving in later.

It doesn't matter which way you put it on the needle.


Put the needle with the stitch on it in your left hand, and the other in your right hand. Keeping the yarn behind both needles, insert the needles in your right hand knitwise (from underneath, going upwards) into the loop, from the front to the back.

If 'front to back' doesn't make sense, just make sure the tip of the RH needle ends up behind the LH needle.


Take the working yarn in your right hand (it's still behind the needles, right?) and wrap it counter clock-wise around the LH needle, bringing it between the two needles:


Bring the tip of the RH needle down and back out the loop, catching the yarn you just wrapped around the RHN:

Creates a new loop on the RH needle.


Slip the new loop from the RH needle to the LH needle; LH needle goes from underneath upward through the loop on RH needle:


Now you have two stitches cast-on:

Booyah!


Repeat (excepting the slip-knot part, of course) until you have the amount of stitches you need.


Here's what it looks like on a ribbed swatch:


It's a bit messier than usual since I cast-on using a needle 3-sizes larger than the one I made the swatch with (to allow it to stretch farther). That is a drawback to this cast-on: it's not super stretchy, and the only way to compensate is to do it loosely. I don't trust myself to do it loosely with any kind of uniformity, so I just use needles 2-3 sizes larger what will be used for the body. I've reached at least one conclusion: I'm not going to be a hand model any time soon.

Monday, March 29, 2010

Infinite test swatch

I started knitting a test swatch for what I've been thinking of as my "South Face" hat. I thought the concept was relatively easy: instead of cabling back and forth, the stitches would keep getting passed the same way (moving always right or always left) and passed over and under each other making a basket-weave. I decided to make a swatch in one color first. It became clear (shamefully, it should have been clear before I started) that if you are constantly moving stitches one direction, they're going to hit the edge eventually and have nowhere to go. I had to make an 'infinite test swatch'--a tube, so the cables could keep moving around. Here's what formed:


I'm sure this is not a new stitch--I'm excellent at reinventing the wheel. This wasn't exactly what I had in mind, but I think it's still cool. There's a lot of tension on it that I'm pretty sure wouldn't be there if two colors were being used, but I need to make another infinite swatch to check it out. I was thinking of writing the pattern so it could be done in one color or two (i.e. and easy/more difficult version) but I think that they would have to be two completely different patterns if the tension is as different as I suspect it is.

What to do with this little gem I just made though? My first thought was a cup cozy. I could write up a quick little pattern for that! Damn it. If you don't have a Ravelry account, here's the gist via screenshot:


Like I said, reinventing the wheel (just published this month though, so closer than normal). Actually, my infinite swatch is a bit too small for your average cup of joe, and I think it makes a nifty bracelet:

Too dorky? I can't even tell anymore.

I love little projects you can do with your scrap yarn, so maybe I'll write this as a pattern.

On a completely unrelated note, I've been noticing a correlation between a car's make and how closely they pass me when I'm cycling home from work. This particular route is in North Berkeley, which consists of winding roads going up a steep hill with virtually no shoulders. While on a conference call, I made a little graph to demonstrate:
OK, let's break it down. The square is, on average, where the brand falls on the "Curve of Courtesy" (patent pending). The bars represent the scatter from that average, for example, Buicks tend to pass anywhere with a 2 ft. to 4 ft. leeway.

Subaru - I may be a bit personally biased since I love my Soobie, but these folks are just nice. They tend to slow way down and pull completely into the other lane, and once I even got a courtesy "I'm here" beep on the horn.

Beater - Originally ranked beaters the same courtesy as Subarus, but my housemate pointed out that the reason they pass slowly may be because they're maxing out their speed up the hill as it is.

Honda - Not overly courteous, but I usually don't feel in any danger either.

Toyota - Similar to Honda. Slightly more dick-ish. May or may not be related to uncontrolled acceleration in Camrys or Priuses (Priusi?)

Volkswagen - These guys are all over the map. I have no idea whether they're going to give me a wide berth or mow me down. Slightly terrifying.

Buick - Tend to pass pretty closely. I attribute it to the fact that most Buicks are owned by old farts (sorry Mom and Dad--call 'em as I see 'em) and they probably notice me and my day-glo yellow vest at the last second and have to swerve around. I understand that you're looking for the nearest Country Kitchen Buffet, but try to keep your eyes on the road.

BMW, Mercedes-Benz - Now we're getting to the true assholes of the road. These are the people believe that only cars should be allowed on the roads, because safely passing a cyclist or pedestrian might make them 30 seconds late to the gala benefiting Beating Up the Homeless.

Two-seaters - How do I say this graciously? These guys have small penises. I know I should feel sorry for them for that, but I'm too busy peeing my pants out of fear.

Porsche - You may be wondering why Porsche is in the negative region; I'm pretty sure that these dudes would swerve to hit a cyclist rather than avoid one.

Sunday, March 28, 2010

Perils of knitting in Napa

After about the third tasting:

"What the....??!"


"Man down! We need another drink over here!"

Thursday, March 25, 2010

Plumb out of luck

I honestly don't know whether the phrase is "plumb out of luck" or "plum", and the interwebs have failed to provide a consensus. I was trying to make a witty pun, sorry. I heard somewhere that puns are the lowest form of humor, but don't they always make you smile? Sure, it's in an "I'm so embarrassed for you" sort of way, but it still lifts your spirits in the sense that you're not the one making the cringe inducing joke. What the hell does the aforementioned phrase mean anyway? Doesn't "plumb" just mean upright and "plum" is an OK fruit that's a delicious addition to pudding? Maybe you're out of plums and you really wanted to make pudding, and so you're POL.

This rambling might be going somewhere eventually. I made my first CO/BO stretchiness test swatch last night, and pondered what my experimental set-up should be. I could pull on all of them to what I felt was their maximum stretch, but when I tried measuring a couple of times on the same swatch, the results weren't consistent. That makes the test qualitative--I can tell by the feel how relatively stretchy I think it is, but I don't have solid numbers to back it up. I felt that this experiment could be at least semi-quantitative, so the idea of the moment is to hang a plumb-bob from the corner of the edge to be tested and measure the vertical stretch.

Now the current problem lies in scoring a plumb-bob. If I was back in WI, I'd stroll into the lab and borrow one. I don't know what I'm going to do when(if) I graduate; it's so nice to have all kinds of limited use tools at your beck and call for that one time you actually need them. How often do you need an Dremel or an acetylene torch (please don't answer if it's going be disturbing)? Here in Berkeley though, I'm working on simulations, which means strictly computer stuff. The simulations work is also sometimes referred to as 'modeling', which never fails to amuse. When I tell someone I'm "working on a modeling project", they invariably get a look on their face that says "modeling for the cover of Crackhead Weekly?" But the upshot is, no access to tools. There are two guys in the group that do experiments with actual stuff instead of playing computer make-believe. But, full disclosure: I'm embarrassed to ask to borrow a plumb-bob because I know they're nice dudes and would go to a lot of trouble to get me one if there wasn't one around, and then I would feel bad about the fact that it's not even close to being for work. I have a soul, it's just a small one.

I also have another idea for a hat that I'm itching to get started on. It's inspired by a North Face hat I've been seeing on the slopes for a couple of years now--I like the idea, but naturally I think that I can do it better. Here's the hat I keep seeing:

I always imagine someone haughtily saying, "The Nawwwwwrth Face" with a British accent.


My goal: add a cute brim, bring down the gauge by about half (meaning stitches half that size) and make the whole shebang two interlacing colors. I think doing it fair-isle-style will beef up the thickness nicely, accounting for the decrease in stitch size (which I'm assuming is why a chunky yarn was used, for thickness). I've been batting this idea around in my head for a loooong while, so I'm going to take the plunge tonight and get started (in parallel with my stretchiness experiments, of course). My only regret--we're just about out of hat-wearing weather. I'm trying to look at it as plenty of time to perfect a kick-ass pattern.

Wednesday, March 24, 2010

Ski gaiter

I recently made a gaiter for my copilot (a scarf was deemed not manly enough) for skiing. The objective - fit snugly around the neck, but able to stretch over the chin.

I chose prime rib stitch (brioche stitch) because of its elasticity and thickness. Also, I love beef, and who doesn't like a juicy prime rib? I decided to knit flat rather than in the round since prime rib naturally makes a nice selvage edge for finishing and after the set up round, the same round is repeated ad nauseum (for nice mindless knitting).

I determined my gauge by knitting a swatch in pattern and measuring it in its relaxed state. I converted that to neck circumference, with the idea being that it would lie relaxed next to the neck, but be able to stretch over the chin and mouth in case of snow flurries. I cast on with a much larger needle (size 8) and bound off with a size 11 in an attempt to ensure the edges didn't hinder the stretchiness. I held two strands Touch Yarn 4 ply to increase the thickness. One could also just use an 8 ply yarn, if one were so inclined.

I can write up a pattern if anyone is interested, but prime rib stitch is fairly simple:

CO even number of stitches
1st row (set up) +K1, YO, sl1 purlwise, rep from +
2nd row (and all subsequent rows) K1, +YO, sl1 purlwise, K2tog, rep from + until last rep end on sl1 purlwise

When you K2tog, you are knitting one stitch and one diagonal loop (created from the last row’s YOs) together. The upshot--you're knitting every other stitch, while simultaneously increasing a stitch (YO) and decreasing a stitch (K2tog). This is what gives it the nice thickness that I was looking for.

Thick! Soft!


Stretchy!


As far as functionality it was deemed good--warm, quick drying, clingy, though slightly less wind-resistant than a conventional ski gaiter--that is, after the struggle of getting it over one's head. Even casting on (CO) with a needle five sizes larger than the one I used, and binding off (BO) with one eight times larger, the ends were still the limiting factors on stretchiness.

"The knitted discomfort is here, and here, Doc."


Granted, the prime rib stitch gives you a fabric similar to that knitted with a needle twice it's size (due to all the stitch slipping), but even accounting for that, the CO was two sizes larger and BO 5 sizes larger at the least. The photo doesn't quite do it justice, but the edge is pretty messy by my standards. Using a larger needle may give it more room to stretch, but it's just going to keep getting uglier and uglier. I need a stretchier method. I've never been very creative in my COs and BOs--if the pattern recommends something, I'll do it, if not, I almost always use the "knitting-on" CO, and the "basic knit" BO. This problem has inspired me to do a (psuedo)scientific experiment on the relative stretchiness/appearance of COs and BOs when done on ribbing (K1, P1 is what I'm thinking). The plan: knit 5" x 5" swatches using 'complementary' COs and BOs, with the assumption that 5" of fabric in between them ensures that one will not limit the stretchiness of the other. I'll have to consider what the actual stretchiness test will be.